MDT COMP MUZZLE BRAKE
V1.0 December, 2021
Tables can't be imported directly. Please insert an image of your table which can be found here.
MDT COMP MUZZLE BRAKE
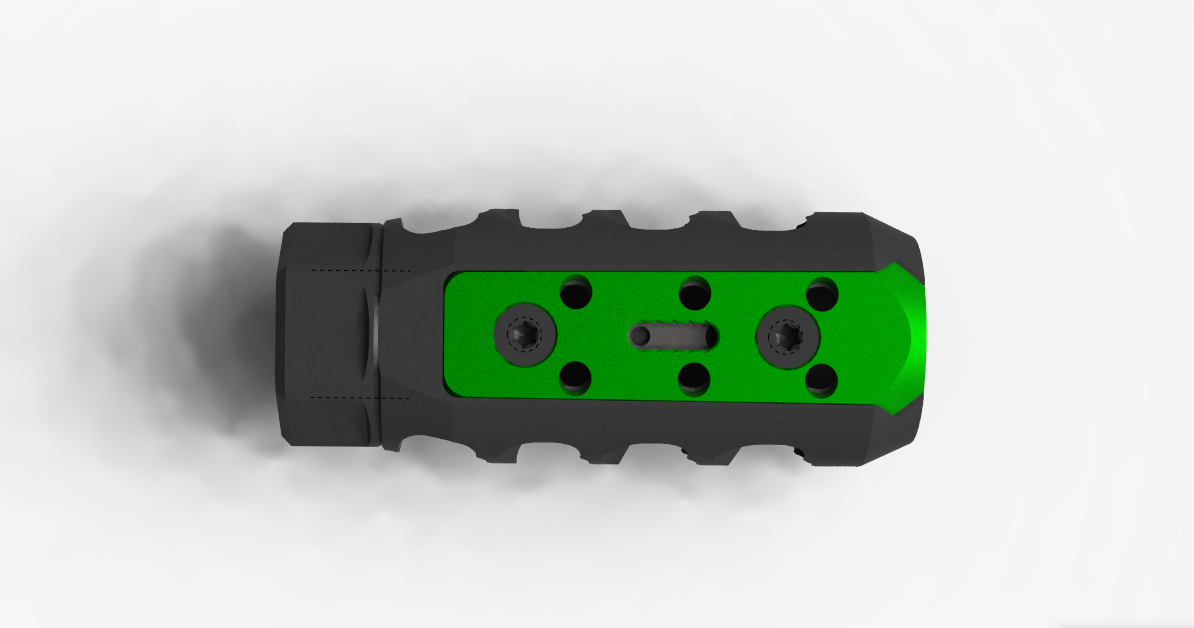
Thank you for choosing the MDT COMP Muzzle Brake. The MDT [COMP BRAKE] was designed from the ground up using input from MDT’s sponsored shooter team, mach flow gas simulations, and countless hours of testing. This muzzle brake is the most effective brake currently available that also provides the least concussion to the shooter and spotter by redirecting gas flow, allowing the shooter to watch bullet flight and monitor hits and misses on target.
MDT Muzzle Brakes are constructed out of a high strength alloy steel and are nitride finished for maximum durability under harsh conditions and are provided with an overlapping, self indexing lock nut. The brake features some unique and groundbreaking geometry such as; angled ports, strategically cut at varying angles to maximize recoil reduction as well as minimizing shooter concussion, forward facing "disruptor" ports to better deflect gas away from the shooter and tuneable upwards vented ports that can be open or closed with a slider mechanism for straighter rifle tracking.
CAUTION: AVOID RESTING OR HITTING THE BARREL AGAINST ANY SURFACE WHILE HANDLING THE ACTION, STOCK, AND CHASSIS.
Tables can't be imported directly. Please insert an image of your table which can be found here.
Installation
Tools needed: 1” Crescent Wrench, Adjustable Crescent Wrench, T15 Hex Key, Bubble Level, Blue Loctite (Optional)
Tables can't be imported directly. Please insert an image of your table which can be found here.
Pre-Installation
WARNING- Ensure that the firearm is unloaded.
- Remove the magazine (if inserted) and bolt.
- Remove any existing muzzle device currently attached to your firearm. If a muzzle device was previously on the firearm you must ensure that the threads are clear of bonding material.
Tables can't be imported directly. Please insert an image of your table which can be found here.
Installing and Adjusting the MDT COMP Muzzle Brake
Once the appropriate thread has been verified, any existing muzzle device has been removed and the firearm is secured and ready to be worked on, the MDT COMP Muzzle Brake can now be installed.
Installation:
OPTIONAL: Apply a drop of semi-permanent (blue), high-temperature Loctite to the threads of your barrel before installing the MDT COMP Muzzle Brake. This will ensure a secure tight connection; however it will increase difficulty in removing the MDT COMP Muzzle Brake if you desire in the future.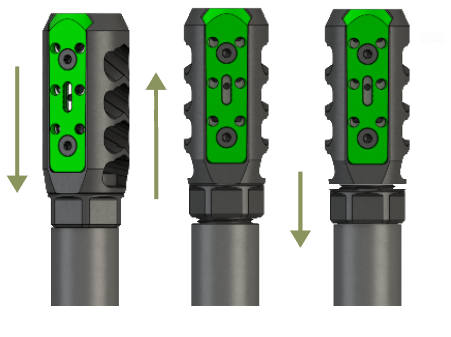
- Hand thread the lock nut onto the MDT COMP Muzzle Brake’s external threads until it bottoms out
- Hand thread the MDT COMP Muzzle Brake onto the barrel until the lock nut makes contact with the shoulder of the thread of your barrel.
- Unscrew the MDT COMP Muzzle Brake until the ports are oriented horizontally and the logo is facing down. Use a bubble level, placed on top of the muzzle brake, to ensure level with your rifle.
- While holding the MDT COMP Muzzle Brake, securely unscrew the lock nut towards the shoulder of your barrel threads.
- Place the adjustable crescent wrench over the MDT COMP Muzzle Brake to hold it securely while using the 1” crescent wrench to loosen, and drive the locknut into the shoulder of the threads on your barrel. The amount of torque to be applied to the lock nut is in the range of 15 - 30 ft-lb.
- Once the MDT COMP Muzzle Brake has been secured onto your firearm is it important to check the alignment of the MDT muzzle brake with the barrel bore. This can be done visually as well as with a tight fitting bore cleaning rod. To do this, insert the cleaning rod through the barrel bore and MDT Muzzle Brake to ensure there is no chance of bullet strikes.
NOTE: MDT muzzle brakes have a break-in period of roughly 20 shots. This ensures that the interior spaces are removed of burrs. Additionally, this brake will not fit on rifles that have a muzzle diameter smaller than 0.790” or 20 mm.
WARNING: Never use a muzzle brake with a smaller bore than the firearm itself.
WARNING: MDT muzzle brakes have been re-designed to direct high pressure gas efficiently though their ports. Blocking these ports while operating the firearm may result in injury or death
WARNING: Muzzle brakes operate by redirecting high pressure gas. This increases the chances of debris being directed at the shooter or any observers and significantly increases noise levels. ALWAYS WEAR PROPER EYE AND EAR PROTECTION WHEN OPERATING A FIREARM OR OBSERVING
Adjustment of the MDT COMP Muzzle Brake:
This section will cover the Tuneable Upwards Venting Ports and how to properly adjust them to better the performance of your rifle system under recoil, allowing you to watch bullet flight and monitor hits and misses on target! Much like the previous section, ensure that the firearm is unloaded, pointed in a safe direction and in a stable position to allow you to work on it.
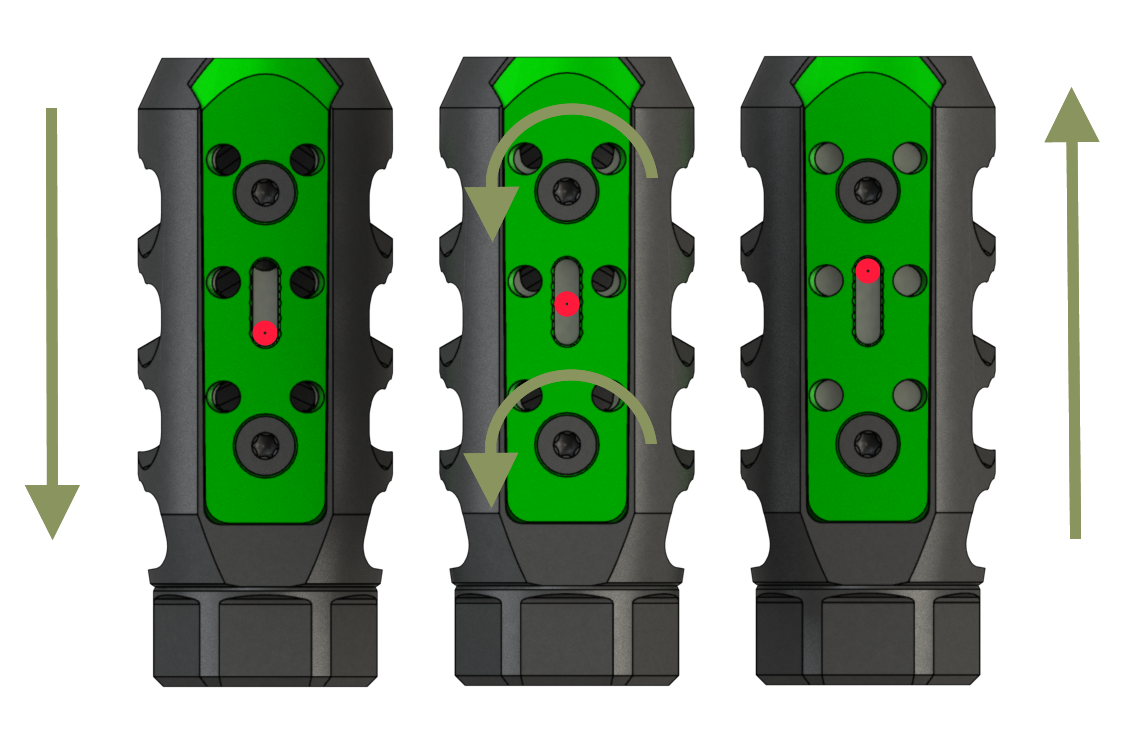
- To adjust the amount of upwards vented gasses out of the top ports of the MDT COMP Muzzle Brake, first locate the two T15 Flat Head Socket Head Cap Screws on top of the brake.
- Loosen both off approximately half a turn to one turn, using your T15 Hex Key.
- Insert anything small enough to fit into the small adjustment window that will catch onto the interior vent plate and allow you to slide it forward and backwards. We’d recommend a bullet tip, small hex key, car key or a very helpful mouse's paw.
- Adjust the interior vent plate forward to close off the ports, or rearward to open up the ports, using the indexing notches as a guide.
- Once the selected position has been achieved and the vent plate holes are opened to the desired amount, repeat the opposite process of steps 1 and 2, by torquing the two T15 screws back to approximately 20 in-lbs.
NOTE: The process of removing or replacing the interior vent plate is essentially the same, however in Step 2, instead of loosening the screws half a turn, just remove them and slide the top and vent plates off the front, replacing the interior vent plate if desired.
WARRANTY
What warranty does MDT provide?
How do I claim warranty on a MDT product?
How does MDT process warranty claims?
What are the warranty limitations?
Jurisdictional Exceptions:
SAFETY GUIDELINES
1. ALWAYS KEEP THE MUZZLE POINTED IN A SAFE DIRECTION.
2. DO NOT RELY ON ANY MECHANICAL SAFETY.
3. UNDERSTAND THE TARGET AND WHAT IS BEYOND THE TARGET.
4. NEVER SHOOT AT WATER OR AT A HARD SURFACE.
5. USE PROPER AMMUNITION.
6. IF THE FIREARM FAILS TO FIRE, DO NOT MOVE.
7. ALWAYS WEAR EYE AND EAR PROTECTION WHEN SHOOTING.
8. VERIFY THAT ACTION AND BARREL ARE CLEAR BEFORE SHOOTING.
9. LEARN THE PARTICULAR CHARACTERISTICS OF EACH FIREARM.
10. SHOOT SOBER!
DISCLAIMER